Practical Web Programming
Showing posts with label php. Show all posts

Wednesday, March 05, 2014

Fix Repeating Content in Email using Handlebars Template

Recently, I reformat our email template and ran into an issue wherein the middle part of the email body is re-populating at the end of the body resulting in duplicate content. The email template was created using Handlebars. My suspect is the character encoding of the production mysql database. But what ever I do (copy the prod DB locally with same encoding, etc), I could not replicate it in my local machine.

Removing the non-printable characters before rendering the content with template fixed it. Here's how I did it.

$cleaned_text = preg_replace('/[\x00-\x1F\x80-\xFF]/', ' ', $text_with_non_printable_chars);

/[\x00-\x1F\x80-\xFF]/ are characters from 0-31, 128-255 in ASCII character code.

Saturday, October 31, 2009

PHP: How to Get the Week Day Dates

In PHP, Getting THE week day dates is not really that difficult. Using a combination of pre-defined PHP functions, you can achieve this. Here's how.

In this example function, I'll use Sunday as the start of the week. The function will accept the year, month and day - the day should be a Sunday, Ex: 2009, 10 and 25.


//FUNCTION TO GET THE WEEK DAY DATES
function get_week_day_dates($year, $month, $day)
{
$start_of_week = mktime(0, 0, 0, $month, $day+(0-(int)date('w')), $year);
for ($x=0; $x<7; $x++)
{
print date('Y-m-d', $start_of_week + $x * 60 * 60 * 24) ."<br/>";
}
}

//USING THE FUNCTION
get_week_day_dates(2009, 10, 25);

Friday, February 27, 2009

How to Pass Value from Javascript to PHP

Although JavaScript and PHP is not the same technology, JavaScript being a client-side technology and PHP a server-side, you can actually pass values from PHP to JavaScript and vice-versa. To do this, all you need is to use a cookie.

In this example source code, I will create a cookie in JavaScript and retrieve the cookie value using PHP. Read on.

JavaScript code to create cookie.

<script type='text/javascript'>
function createCookie(name, value,expiredays)
{
var expiry_date = new Date();
expiry_date.setDate(expiry_date.getDate() + expiredays);
document.cookie=name+ "=" +escape(value)+
((expiredays==null) ? ""
:";expires="+expiry_date.toGMTString());
alert("'" + name + "' cookie created.");
}
</script>


HTML code to call the createCookie function.

<input type="button" value="Create Cookie using JavaScript" 
onclick="createCookie('YourName', 'Joel Badinas')"/>


HTML form for submitting request to the server for the PHP code.

<form method="POST" action=""> 
<p>
<input type="submit" name="submit" value="Get Cookie using PHP"/>
</p>
</form>


PHP code that will read the cookie.

<?php
if (isset($_POST["submit"]))
{
print "Cookie value is '".$_COOKIE["YourName"]."'";
}
?>


Putting it all together.

<html>
<head>
<title>Practical Web Programming</title>

<script type='text/javascript'>
function createCookie(name, value,expiredays)
{
var expiry_date = new Date();
expiry_date.setDate(expiry_date.getDate() + expiredays);
document.cookie=name+ "=" +escape(value)+
((expiredays==null) ? ""
:";expires="+expiry_date.toGMTString());
alert("'" + name + "' cookie created.");
}
</script>

</style>

</head>
<body>

<p method="POST" action="">
<p>
<input type="button" value="Create Cookie using JavaScript"
onclick="createCookie('YourName', 'Joel Badinas')"/>
<input type="submit" name="submit" value="Get Cookie using PHP"/>
</p>
</form>

<?php
if (isset($_POST["submit"]))
{
print "Cookie value is '".$_COOKIE["YourName"]."'";
}
?>

</body>
</html>


There you have it.

Thursday, February 19, 2009

PHP: How to Get the Time Elaped

Using PHP's time function, you can get the time elapsed of any process in your web application. The time function returns the current Unix timestamp.

Here's a simple script to demonstrate it.


<?php

$t1 = time();

print "Start time : ".$t1."<br>";

for ($i = 0; $i < 90000000; $i++)
{
print "";
}

$t2 = time();
print "End time : ".$t2."<br>";
print "Time elapsed (s) : ".($t2 - $t1)."<br>";

?>


The script above will output the following.


Start time : 1235100956
End time : 1235100980
Time elapsed (s) : 24

Friday, January 30, 2009

PHP: How to Get the Last Element of an Array

If you know it's length, getting the last element of an array is easy. You just put the index of the last element and you have it's value. But what if you don't know it's length or your array is populated at runtime and it's length is dynamic? Now you got a problem :).

To solve this, you also need a dynamic approach. Using PHP's count function, you can dynamically get the last element of an array. Here's how.

<?php

//Getting the last element of an array dynamically

$arr = array("one", "two", "three", "four", "five");
print "Last element: " . $arr[count($arr) -1];

?>


Take note that in PHP, arrays starts at 0, so if you have five elements, the index of the first element is 0 and the last's is 4. So the code count($arr) will return 5, while count($arr) - 1 will return 4.

Thursday, January 29, 2009

Types of Loops in PHP

A programming loop is a sequence of statements which is specified once but can also be performed several times in succession. Looping construct is one of the most powerful feature of all programming language. Using loops, you can duplicate task to any number of repetitions.

If PHP, this are four types of looping construct, the while, do...while, for and foreach loop. The following example demonstrates how to use each loop.

Using the while loop.

<?php

$x=1;
while($x<=10)
{
echo "The number is " . $x . "<br />";
$x++;
}

?>


while loop output:

The number is 1
The number is 2
The number is 3
The number is 4
The number is 5
The number is 6
The number is 7
The number is 8
The number is 9
The number is 10


Using the do...while loop.

<?php

$x=1;
do
{
echo "The number is " . $x . "<br />";
$x++;
}
while ($x<10);

?>


do...while loop output:

The number is 1
The number is 2
The number is 3
The number is 4
The number is 5
The number is 6
The number is 7
The number is 8
The number is 9


Using the for loop.

<?php

for ($x=1; $x<=10; $x++)
{
echo "The number is " . $x . "<br />";
}

?>


for loop output:

The number is 1
The number is 2
The number is 3
The number is 4
The number is 5
The number is 6
The number is 7
The number is 8
The number is 9
The number is 10


Using the foreach loop.

<?php

$arr=array("one", "two", "three", "four", "five");
foreach ($arr as $value)
{
echo "Value: " . $value . "<br />";
}

?>


foreach loop output:

Value: one
Value: two
Value: three
Value: four
Value: five

Wednesday, January 28, 2009

PHP: How to Parse XML Using the DOMDocument Class

I this example, I will show you how to parse (or read) XML documents using PHP. I will be using the XML that I created in the Output MySQL Records to XML Using PHP post.

To parse XML, I will be using PHP's DOMDocument class. Here's the example.

<?php

//CREATE AN INSTANCE OF DOMDocument() CLASS
$doc = new DOMDocument();

//LOAD THE XML
$doc->loadXML($xml);

//READ THE <employee> AND LOOP THROUGH IT

$employees = $doc->getElementsByTagName("employee");
foreach($employees as $employee)
{
//READ THE <firstname> AND GET THE NODE VALUE
$firstnames = $employee->getElementsByTagName("firstname");
$firstname = $firstnames->item(0)->nodeValue;

//READ THE <lastname> AND GET THE NODE VALUE
$lastnames = $employee->getElementsByTagName("lastname");
$lastname = $lastnames->item(0)->nodeValue;

//DISPLAY IT
print $firstname." ".$lastname."<br/>";
}

?>


The above source code will have the following output.

Steven King
Neena Kochhar
Lex De Haan
Alexander Hunold
Bruce Ernst
David Austin
Valli Pataballa
Diana Lorentz
Nancy Greenberg
Daniel Faviet
John Chen
Ismael Sciarra
Jose Manuel Urman
Luis Popp
Den Raphaely
Alexander Khoo
Shelli Baida
Sigal Tobias
Guy Himuro
Karen Colmenares
Matthew Weiss


If you want to parse an physical XML file (an XML file that is saved in your server), use load rather than loadXML.

Tuesday, January 27, 2009

PHP: How to Create XML Document from MySQL Records

In this example, I'll be showing how to create XML document from MySQL records using PHP.

XML (Extensible Markup Language) is a general-purpose specification for creating custom markup languages. Aside from creating web pages, the most important use of XML is data sharing. Using XML you can pass data to different computer and applications without it being converted into another form.

Fortunately for PHP developers, creating XML from MySQL data is just like creating HTML. I'll be using the database table from this post. Here's the source codes.

<?php

//CREATE A DATABASE CONNECTION
$db_conn = mysql_connect("localhost", "root", "root1")
or die("Cannot connect to the database. ".mysql_error());
//SELECT THE DATABASE TO USE
mysql_select_db("test");

$sql = "SELECT
first_name, last_name, email
FROM employees";

$result = mysql_query($sql, $db_conn);

$xml = "<?xml version='1.0' encoding='UTF-8'?>
<employees>";
while ($row = mysql_fetch_assoc($result))
{
$xml .= "<employee>";
$xml .= "<firstname>".$row["first_name"]."</firstname>";
$xml .= "<lastname>".$row["last_name"]."</lastname>";
$xml .= "</employee>";
}
$xml .= "</employees>";

//DISPLAY THE XML
print $xml;

?>


This will output the following. I added line breaks (using enter key) at the end of every </employee> tags to make it more readable.

<?xml version='1.0' encoding='UTF-8'?>
<employees>
<employee><firstname>Steven</firstname><lastname>King</lastname></employee>
<employee><firstname>Neena</firstname><lastname>Kochhar</lastname></employee>
<employee><firstname>Lex</firstname><lastname>De Haan</lastname></employee>
<employee><firstname>Alexander</firstname><lastname>Hunold</lastname></employee>
<employee><firstname>Bruce</firstname><lastname>Ernst</lastname></employee>
<employee><firstname>David</firstname><lastname>Austin</lastname></employee>
<employee><firstname>Valli</firstname><lastname>Pataballa</lastname></employee>
<employee><firstname>Diana</firstname><lastname>Lorentz</lastname></employee>
<employee><firstname>Nancy</firstname><lastname>Greenberg</lastname></employee>
<employee><firstname>Daniel</firstname><lastname>Faviet</lastname></employee>
<employee><firstname>John</firstname><lastname>Chen</lastname></employee>
<employee><firstname>Ismael</firstname><lastname>Sciarra</lastname></employee>
<employee><firstname>Jose Manuel</firstname><lastname>Urman</lastname></employee>
<employee><firstname>Luis</firstname><lastname>Popp</lastname></employee>
<employee><firstname>Den</firstname><lastname>Raphaely</lastname></employee>
<employee><firstname>Alexander</firstname><lastname>Khoo</lastname></employee>
<employee><firstname>Shelli</firstname><lastname>Baida</lastname></employee>
<employee><firstname>Sigal</firstname><lastname>Tobias</lastname></employee>
<employee><firstname>Guy</firstname><lastname>Himuro</lastname></employee>
<employee><firstname>Karen</firstname><lastname>Colmenares</lastname></employee>
<employee><firstname>Matthew</firstname><lastname>Weiss</lastname></employee>
</employees>


Note: To view the full output, right click on the browser and select 'View Source' or 'View Page Source'.

Monday, January 26, 2009

PHP: How to Print Each Character in a String

With PHP's growing string functions, you will be able to find one that will suit your need. For instance the substr, this function will return the portion of string specified by the start and length parameters. You can you use it to print each character in a string.

Here's an example.

    
$string = "Joel P. Badinas";

for ($i = 0; $i < strlen($string); $i++)
{
print "[" . $i . "] " . substr($string, $i, 1) ."<br/>";
}

?>


The output will be like this.

  [0]  J
[1] o
[2] e
[3] l
[4]
[5] P
[6] .
[7]
[8] B
[9] a
[10] d
[11] i
[12] n
[13] a
[14] s

Sunday, January 25, 2009

Database Insert, Update and Delete Using PHP and MySQL

One of the best uses of PHP to the MySQL database is data manipulation. PHP's native support to MySQL is a big advantage to developers who uses the two. Once you got PHP and MySQL running in your server, you're good to go toward dynamic web application.

In the following examples, I'll be focusing on how to do data INSERT, UPDATE, and DELETE to the database using the web's two powerful combination, PHP and MySQL.

Here's the first one, doing data INSERT to the database. In these examples, I use the table from this post which I created in the test database in MySQL.

<?php

//CREATE A DATABASE CONNECTION
$db_conn = mysql_connect("localhost", "root", "root1")
or die("Cannot connect to the database. ".mysql_error());
//SELECT THE DATABASE TO USE
mysql_select_db("test");

//COMPOSE THE SQL
$sql = "INSERT INTO employees (
first_name,
last_name,
email,
phone_number)
VALUES (
'Joel',
'Badinas',
'kabalweg@gmail.com',
'123.456.7890')";

//EXECUTE SQL
$result = mysql_query($sql, $db_conn);

//CHECK IF QUERY IS SUCCESSFUL
if(mysql_affected_rows($db_conn) > 0)
{
print "Save successful";
}
else
{
print "Error: ".mysql_error();
}

?>


And here's how to do the data Update.

<?php

//CREATE A DATABASE CONNECTION
$db_conn = mysql_connect("localhost", "root", "root1")
or die("Cannot connect to the database. ".mysql_error());
//SELECT THE DATABASE TO USE
mysql_select_db("test");

//COMPOSE THE SQL
$sql = "UPDATE employees SET
first_name = 'Kabalweg'
WHERE first_name = 'Joel'
AND last_name = 'Badinas'";

//EXECUTE SQL
$result = mysql_query($sql, $db_conn);

//CHECK IF QUERY IS SUCCESSFUL
if(mysql_affected_rows($db_conn) > 0)
{
print "Update successful";
}
else
{
print "Error: ".mysql_error();
}

?>


And the last is the DELETE.

<?php

//CREATE A DATABASE CONNECTION
$db_conn = mysql_connect("localhost", "root", "root1")
or die("Cannot connect to the database. ".mysql_error());
//SELECT THE DATABASE TO USE
mysql_select_db("test");

//COMPOSE THE SQL
$sql = "DELETE FROM employees
WHERE first_name = 'Kabalweg'
AND last_name = 'Badinas'";

//EXECUTE SQL
$result = mysql_query($sql, $db_conn);

//CHECK IF QUERY IS SUCCESSFUL
if(mysql_affected_rows($db_conn) > 0)
{
print "Delete successful";
}
else
{
print "Error: ".mysql_error();
}

?>


There you have it. The source codes are well commented so you should be able to follow. If not, post a question in the comment.

Thursday, January 22, 2009

PHP: Using foreach to Loop Through Array

The foreach looping construct in one of the less used looping construnct in the programming language, and PHP is not an exception. This is because in PHP, the foreach works only with arrays and will spit an error if used with other data type.

Anyways, using the foreach loop construct is really easy. See example below.

$array = array("j", "o", "e", "l", "b", "a", "d", "i", "n", "a", "s");

foreach ($array as $char)
{
print $char."<br/>";
}


The above example will output below.

j
o
e
l
b
a
d
i
n
a
s

Wednesday, January 21, 2009

How to Truncate Text in PHP

Here's a simple tutorial on how to truncate text in PHP. In this tutorial, I'll be using the substr function. See the sourcecode below.

<?php

$text = 'The quick brown fox jumps over the lazy dog';
$truncated1 = substr($text, 0, 20);
$truncated2 = substr($text, 20, 40);

print "<br/>The original text: ". $text;
print "<br/>The truncated text 1: ". $truncated1;
print "<br/>The truncated text 2: ". $truncated2;

?>


Using the substr function, you can truncate a text to whatever length you want by changing the third parameter and also change the start position by changing the second parameter.

The above PHP script will output the following:

The original text: The quick brown fox jumps over the lazy dog
The truncated text 1: The quick brown fox
The truncated text 2: jumps over the lazy dog

Friday, January 16, 2009

Simple PHP and Ajax Tutorial

When I was beginning web development, Ajax was all blur to me. Whenever I need Ajax functionality for my PHP project, I would go to the web and search to similar Ajax examples that fit need. Although today I'm not yet a master of this WEB 2.0 technique, I can say I passed the beginner stage.

In PHP, a simple, yet powerful implementation of Ajax is querying and displaying the result of a database query. This makes your web application run faster than just pure PHP because the browser don't have to load.

This simple PHP and Ajax tutorial is composed of three files, namely, index.php, ajax.js and ajax.php. I will be using the database from this post.

Here's the index.php. This file contains the HTML codes and the container in which the result of the query will be displayed.

<html>

<head>
<title>A Simple PHP-Ajax Tutotial</title>
<script src="ajax.js"></script>
</head>

<body>

<br/><input type='button' value='Query' onclick='queryDb()' name='Query' /><br/>

<div id='container'></div>

</body>
</html>


The ajax.js file contains the Javascript code.

//CREATE A VARIABLE THAT WILL HOLD THE XMLHttpRequest OBJECT
request = null;

//THIS FUNCTION WILL CREATE AN INSTANCE OF XMLHttpRequest OBJECT
AND RETURN IT TO THE CALLING FUNCTION
function GetXmlHttpObject()
{
var xmlHttp=null;
try
{
// Firefox, Opera 8.0+, Safari
xmlHttp=new XMLHttpRequest();
}
catch (e)
{
//Internet Explorer
try
{
xmlHttp=new ActiveXObject("Msxml2.XMLHTTP");
}
catch (e)
{
xmlHttp=new ActiveXObject("Microsoft.XMLHTTP");
}
}
return xmlHttp;
}

//THIS FUNCTION WILL CALL THE GetXmlHttpObject() FUNCTION AND THE ajax.php PAGE
function queryDb()
{
//DISPLAY THE 'LOADING' TEXT IN THE DIV CONTAINER
document.getElementById("container").innerHTML = "Loading";
//CREATE AN INSTANCE OF XMLHttpRequest OBJECT
request = GetXmlHttpObject();
//SET queryDone FUNCTION TO THE onreadystatechange EVENT
request.onreadystatechange = queryDone;
//OPEN THE PHP PAGE USING THE POST METHOD
request.open("POST", "ajax.php", true);
//SEND THE REQUEST
request.send(null);
}

//HELPER FUNCTION FOR queryDb()
function queryDone()
{
if (request.readyState == 4)
{
if (request.status == 200 || request.status == 304)
{
//GET THE RESPONSE FROM THE PHP PAGE
results = request.responseText;
//DISPLAY THE RESPONSE IN THE DIV CONTAINER
document.getElementById("container").innerHTML = results;
}
else
{
//IF A ERROR OCCUR, DISPLAY IT IN THE DIV CONTAINER
document.getElementById("container").innerHTML = "ajax error:\n" + request.statusText;
}
}
}


The ajax.php file contains the PHP code that will connect and query the database. It will display the result of the query using the print function, which will in turn will be passed by the Javascript code to the HTML container.

<?php

//CONNECT TO MYSQL DATABASE
$con = mysql_connect("localhost", "root", "root1")
or die("<p class='error-msg'>Cannot connect to the database. ".mysql_error()."</p>");

//SELECT A DATABASE
mysql_select_db("test");

//COMPOSE QUERY
$sql = "
SELECT
CONCAT(first_name, ' ', last_name) AS name
FROM employees
LIMIT 0, 10";

//print "<pre>".$sql."</pre>";

//EXECUTE THE QUERY
$result = mysql_query($sql, $con);

while ($row = mysql_fetch_assoc($result))
{
print "<br/>".$row["name"];
}

?>


To run this example, copy and paste the sourcecodes above, name it index.php, ajax.js and ajax.php respectively and save it in the same folder of your server.

Thursday, January 15, 2009

PHP: How to Delete the First and Last Character in a String

Using PHP's substr and strlen functions, you can delete the first and last character in a string. Here's the syntax of the functions from the PHP documentation website.

string substr  ( string $string  , int $start  [, int $length  ] )

int strlen ( string $string )


substr returns a part of a string, while strlen returns the length of a string. See below for the example.

<?php

$my_name = "Joel Badinas";
$str_length = strlen($my_name);

$no_first_char = substr($my_name, 1, $str_length);
$no_last_char = substr($my_name, 0, $str_lenght - 1);

print ("Original String : " . $my_name . "<br/>");
print ("No first character: " . $no_first_char . "<br/>");
print ("No last character: " . $no_last_char . "<br/>");

?>


The above source code will display the following:

Original String : Joel Badinas
No first character: oel Badinas
No last character: Joel Badina

Monday, January 12, 2009

PHP and MySQL Search/Browse Pagination Tutorial

Pagination in a website is very useful, especially in a search or browse page. In fact, almost all website with search pages utilize this technique. And no other websites other than search engines benefit from this. Here's simple implementation of Google.
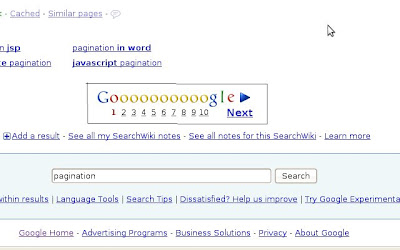
google pagination

That being said, it's time you add this feature to you blog or website. Fortunately for us, search and browse pagination in PHP and MySQL in fairly easy, thanks to MySQL's LIMIT keyword that you can use in SELET queries.

In this tutorial, I'm going to use the database from this post.

Start by setting the size or the number of rows of each page.
$page_size = 10;


Connect to the database and select the database to use.
$con = mysql_connect("localhost", "root", "root1") 
or die("Cannot connect to the database. ".mysql_error().");

mysql_select_db("test");


Using MySQL's CEILING function, count the number of pages by dividing the rows with the $page_size variable we declared earlier.
//COMPOSE QUERY
$sql = "SELECT
CEILING(count(1) / ".$page_size.") AS count
FROM employees";

$result = mysql_query($sql, $con);

if ($row = mysql_fetch_assoc($result))
{
$page_count = $row["count"];
}


Using the HTML <a> tag, display the number of pages.
for ($i = 1; $i < $page_count + 1; $i++)
{
print "<a href='?page=".$i."'>".$i."</a>  ";
}


Check if the GET variable, page, is available and set the $limit variable.
if (isset($_GET["page"]))   
{
$page_no = $_GET["page"];
$limit = ($page_no * $page_size) - $page_size;
}
else
{
$limit = 0;
}


Compose and execute the query and display the result.
$sql = "SELECT
CONCAT(first_name, ' ', last_name) AS name
FROM employees
LIMIT ".$limit .", ".$page_size;


$result = mysql_query($sql, $con);

print "<br/>";
while ($row = mysql_fetch_assoc($result))
{
print "<br/>".$row["name"];
}


Here's the complete code.
//SET THE ROWS FOR EVERY PAGE
$page_size = 10;

//CONNECT TO MYSQL DATABASE
$con = mysql_connect("localhost", "root", "crop")
or die("<p class='error-msg'>Cannot connect to the database. ".mysql_error()."</p>");

//SELECT A DATABASE
mysql_select_db("test");

//COMPOSE QUERY
$sql = "SELECT
CEILING(count(1) / ".$page_size.") AS count
FROM employees";

//EXECUTE THE QUERY
$result = mysql_query($sql, $con);

if ($row = mysql_fetch_assoc($result))
{
$page_count = $row["count"];
}

//DISPLAY A LINK TO THE NUMBER OF PAGES
for ($i = 1; $i < $page_count + 1; $i++)
{
print "<a href='?page=".$i."'>".$i."</a>  ";
}

//CHECK IF PAGE VARIABLE IS AVAILABLE AND CALCULATE THE LIMIT
if (isset($_GET["page"]))
{
$page_no = $_GET["page"];
$limit = ($page_no * $page_size) - $page_size;
}
else
{
$limit = 0;
}

//COMPOSE QUERY
$sql = "SELECT
CONCAT(first_name, ' ', last_name) AS name
FROM employees
LIMIT ".$limit .", ".$page_size;


//EXECUTE THE QUERY
$result = mysql_query($sql, $con);

print "<br/>";
while ($row = mysql_fetch_assoc($result))
{
print "<br/>".$row["name"];
}


If you follow my example above, you should be able to see the result like this.
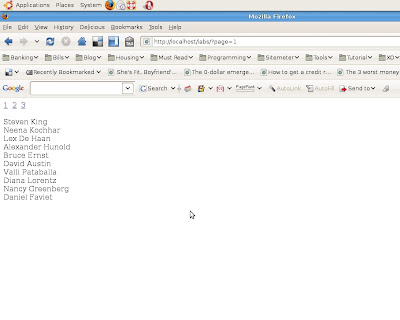
pagination result

Tuesday, January 06, 2009

PHP: How to Format Date Using date and strtotime Functions

In PHP formatting a date to your desired format is so easy using the date and strtotime functions.

According to the PHP documentation strtotime parses any English textual datetime description into a Unix timestamp. It expects to be given a string containing a US English date format and will try to parse that format into a Unix timestamp (the number of seconds since January 1 1970 00:00:00 UTC)

Syntax:

int strtotime  ( string $time  [, int $now  ] )


Example:

print strtotime("Dec. 25, 2008 10:00 AM");


The date function on the other hand returns a string formatted time/date according to the given format string using the given integer timestamp or the current time if no timestamp is given.

Syntax:

string date  ( string $format  [, int $timestamp  ] )


Example:

print date("M d, Y H:i:s A");


So much for the long explanation. Here's how to format a date using the both functions.

print date("M d, Y H:i:s A", strtotime("Dec. 25, 2008 10:00 AM"));


For the complete list of format for the date functions, visit the PHP documentation here.

Tuesday, December 30, 2008

PHP: How to Dynamically Alternate the Table Row Background Color

In PHP, making the <table> row background color alternate dynamically is relatively easy. The key here is PHP's modulo (%) operator. Using the % operator inside a loop construct, you can reference every other row in an HTML <table>. See the example below.

Create the CSS rules.
.alt-color-1{
background-color:red;
}

.alt-color-2{
background-color:green;
}


Create the PHP script.
<?php
print "<table width='200' border='1' cellspacing='1' cellpadding='1'>";
for ($i = 0; $i < 10; $i++)
{
if (($i % 2) == 0)
{
$alt = "alt-color-1";
}
else
{
$alt = "alt-color-2";
}

print "<tr class='".$alt."'>";
print "<td>".$i."</td>";
print "</tr>";
}
print "</table>";
?>


Put it all together.
<html>
<head>
<title>Alternate Color in Table Rows</title>

<style>
.alt-color-1{
background-color:red;
}
.alt-color-2{
background-color:green;
}
</style>

</head>
<body>

<?php
print "<table width='200' border='1' cellspacing='1' cellpadding='1'>";

for ($i = 0; $i < 10; $i++)
{
if (($i % 2) == 0) //USE THE MODULO OPERATOR
{
$alt = "alt-color-1";
}
else
{
$alt = "alt-color-2";
}

print "<tr class='".$alt."'>";
print "<td>".$i."</td>";
print "</tr>";
}
print "</table>";
?>

</body>
</html>


After executing the PHP script, here's what the webpage will look.

PHP: How to Dynamically Alternate the Table Row Background Color

Friday, December 26, 2008

PHP: How to Display The Current Month in Calendar Style

Displaying the current month in a calendar style is very handy and user-friendly for a website, specially for a blog. Using a calendar-style navigation your visitors can easily navigate through your previous posts and articles.

Fortunately, in PHP, this seemingly difficult task in HTML is relatively easy. Just by using a nested For Loop and PHP's Date functions, use can build your own calendar.

Here's the simple source code.

<?php
$now = getdate(time());
$time = mktime(0,0,0, $now['mon'], 1, $now['year']);
$date = getdate($time);
$dayTotal = cal_days_in_month(0, $date['mon'], $date['year']);

print '<table><tr><td colspan="7"><strong>' . $date['month'] . '</strong></td></tr>';
for ($i = 0; $i < 6; $i++)
{
print '<tr>';
for ($j = 1; $j <= 7; $j++)
{
$dayNum = $j + $i*7 - $date['wday'];
print '<td';
if ($dayNum > 0 && $dayNum <= $dayTotal)
{
print ($dayNum == $now['mday']) ? ' style="background: #aaa;">' : '>';
print $dayNum;
}
else
{
print '>';
}
print '</td>';
}
print '</tr>';
if ($dayNum >= $dayTotal && $i != 6)
{
break;
}
}
print '</table>';
?>

Here's how the calendar will look like.


To make it fancier, all you have to do now is use CSS to add colors and styles.

Saturday, December 20, 2008

PHP: Checking If Email is Valid with filter_var Function

In PHP 4, checking if an email is valid uses regular expressions. But with PHP 5, you can use the filter_var function. This function returns the filtered data, or false if the filter fails.

Here's the syntax.

mixed filter_var ( mixed $variable [, int $filter [, mixed $options ]] )

Where:
variable = Value to filter.
filter = ID of a filter to use. Defaults to FILTER_SANITIZE_STRING.
options = Associative array of options or bitwise disjunction of flags.


Here's how to use the function.

if (filter_var(trim($email), FILTER_VALIDATE_EMAIL))
{
echo $email . " is valid.";
}
else
{
echo $email . " is invalid.";
}

Friday, December 05, 2008

PHP: A Simple Function to Create an HTML Select Date Options

Here's a simple PHP function to create a select date options that you can use in your HTML forms to let users select a date. This is simple and easy to use. Below is the function definition.

//RETURN DATE OPTIONS IN HTML
function get_date_options($year = 0000, $month = 00, $day = 00)
{
$ret_val = "";

//ASSEMBLE MONTHS
$options = "<option value='00'>MM</option>";
for ($i = 1; $i < 13; $i++)
{
$attribute = "value='".$i."'";
if ($i == $month)
{
$attribute .= " selected ";
}
$options .= "<option ".$attribute.">".str_pad($i,2,0,STR_PAD_LEFT)."</option>";
}
$ret_val .= "<select name='month'>".$options."</select> / ";

//ASSEMBLE DAYS
$options = "<option value='00'>DD</option>";
for ($i = 1; $i < 32; $i++)
{
$attribute = "value='".$i."'";
if ($i == $day)
{
$attribute .= " selected ";
}
$options .= "<option ".$attribute.">".str_pad($i,2,0,STR_PAD_LEFT)."</option>";
}
$ret_val .= "<select name='day'>".$options."</select> / ";

//ASSEMBLE YEARS
$options = "<option value='0000'>YYYY</option>";
for ($i = 2008; $i < 2051; $i++)
{
$attribute = "value='".$i."'";
if ($i == $year)
{
$attribute .= " selected ";
}
$options .= "<option ".$attribute.">".$i."</option>";
}
$ret_val .= "<select name='year'>".$options."</select>";

return $ret_val;
}


Here's a simple way to use it.

Enter your birthday : <?php print get_date_options() ?>


And here's a way to use it to make default to a date.

Enter your birthday : <?php print get_date_options("2008", "12", "05") ?>

Recent Post
